How Do You Track Jobs in QuickBooks? Part 2
In this second of a two-part series, we’ll explore how you use the job-related records you’ve created.
Last month, we showed you how to start building a foundation for tracking jobs in QuickBooks. We explained that you can use the software’s jobs tools to track income and expenses for any related group of items and/or services (you can think of them as projects, if you prefer).
We covered three elements of preparing to use “jobs”:
- Creating job records that you can use in transactions (example: develop promotional materials)
- Creating item records that can be assigned to jobs (example: website development)
- Determining whether you’ll need to create a new account in your Chart of Accounts for your job income and expenses. You should consult with us anytime you think it might be necessary to modify the Chart of Accounts.
Using Your Job-Related Records
Now that you’ve recorded the items and jobs themselves, you can start using them in transactions, and eventually track your progress by generating reports.
Let’s say you worked eight hours on website development for your promotion job. You’d open the Employees menu and select Enter Time | Time/Enter Single Activity to open this window:
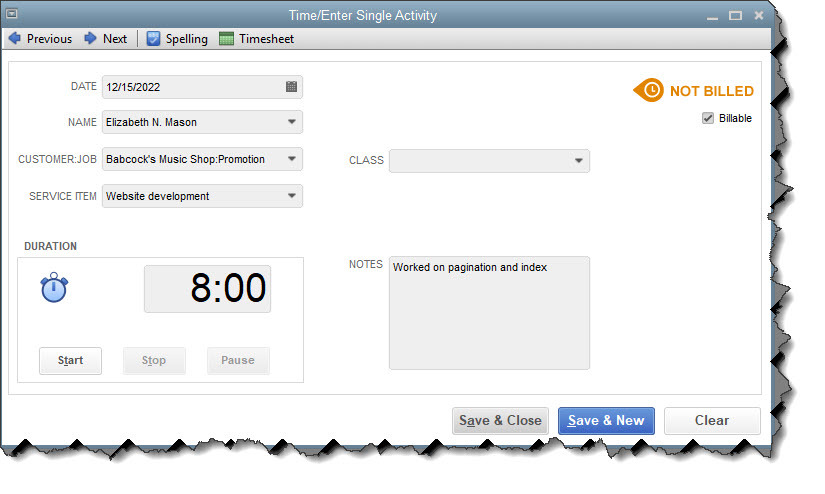
You can enter individual, billable activities and assign them to jobs.
In the example above, you’re limited to recording one day’s work on a specific SERVICE ITEM. You’d verify the date and select from the drop-down lists to complete the fields for employee NAME, CUSTOMER:JOB, and SERVICE ITEM. You can either use the timer to time the job or enter the number of hours manually in the DURATION box. Click in the Billable box to create a checkmark and add NOTES if you’d like. The CLASS field is optional; talk to us if you’re not familiar with this feature.
If you worked on two separate service items on the same day for that CUSTOMER:JOB, you would create two individual records. You can also enter billable activities directly on a timesheet by clicking Employees | Enter Time | Use Weekly Timesheet. Once you select the employee NAME at the top, any single activity(ies) you created that week will appear as individual records, and vice versa.
Writing a check or using a credit card for a job-related purchase that should be billed to the customer? You’d fill out these forms in QuickBooks like you usually do, making sure that you document the items or services by highlighting the Items tab, select the correct CUSTOMER:JOB, and make a checkmark in the BILLABLE? column.

If you write a check or charge your credit card for purchases that can be billed to a CUSTOMER:JOB, be sure to record it in QuickBooks.
If you’ll be doing some billable driving for your job, you should also be tracking your mileage in QuickBooks. Open the Company menu and select Enter Vehicle Mileage. If you haven’t created a VEHICLE record in QuickBooks, click <Add New> and easily do so. Complete the rest of the fields and save.
Tip: Do you want to see some of your overhead expenses on job costing reports? Create a CUSTOMER:JOB named “Overhead” and assign related costs to it.
Billing the Billables
When the time comes to invoice your customers (Customers | Create Invoices), you’ll see how your careful work in QuickBooks simplifies that task. Open an invoice form and select a CUSTOMER:JOB. If you’ve entered billable items for him or her, this small window will open:
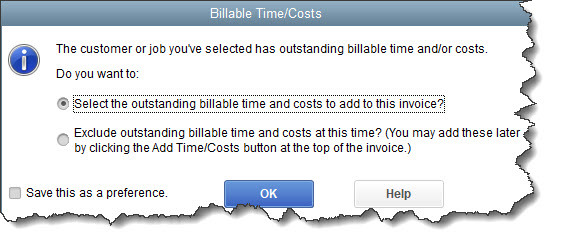
When you create an invoice for a CUSTOMER:JOB who has billable time, mileage, or other expenses, QuickBooks can automatically add them.
If you leave the first option checked and click OK, another window will open that lists all of the expenses you’ve marked as billable to the customer, arranged by type. Click in the first column of each expense you want to include and click OK. Your invoice containing those entries will open. Do any editing necessary, and then save it.
Note: You’ll probably notice two fields in the Choose Billable Time and Costs window that refer to Markup. This is an advanced concept that we can explore with you, should you want to charge customers more for expenses you’ve incurred on their behalf.
Related Reports
QuickBooks contains a wide variety of reports related to your work billing customers for jobs. Click Reports in the navigation pane or Windows menu, then Jobs, Time & Mileage to see what’s available. Choose a date range and click Run to see them appear with your own data.
If you’ve never worked with jobs in QuickBooks, we strongly recommend that you let us help you here. There are a lot of moving parts, and you don’t want to miss out on any of your efforts or expenses that are billable.